PSP Licenses
ADI-00825
Arthur Crowe's Factory
AC267
Barbara Jensen Tubes
BJ3386
CILM
CI-3629LM
Creative Design Outlet
CDO-1263
Dreamscape Imaging
DSI-771
Ismael Rac
IRK2573M
My PSP Tubes
MPT-5299
My Tag Art
TARTKIMI
Myka Jelina
MJ-1332
My Tubed Art
MTA-2352
PicsForDesign
PFD-MCM
PSP Asylum
PA0164
PSP Tubes Emporium
PTE-0385
Scraps 'n Crap
SNC_Kimi
Scraps and the City
SATC-1301
Toosh Toosh
TOOSH1606
Zindy Nielsen
ZZT2839
Free Fonts
Free Stock Photos
Fav Forums
Store Favs
- Arthur Crowe's Factory
- Artistic Dreams Imaging
- Artistically Inclined Licensing
- Barbara Jensen Tubes
- BJ's Haven Digital Art Studio
- Creative Design Outlet
- Doodle Dragon Studios
- Dreamscape Imaging
- Gorjuss (Suzanne Woolcott)
- Ismael Rac
- Jaguar Woman
- Lynne's Designs
- My Tubed Art
- Myka Jelina Graphics
- Nemain Ravenwood
- Outlaw by Design
- Pat Carlucci
- Perfect Posers
- PicsForDesign
- PSP Tube Stop
- PSP Tubes Emporium
- Queen Uriel's Tube Store
- Scraps and the City
- Swt MeloDe's Place
- The Hunter
- The PSP Project
- TooshToosh
- UFDesigns
- Up Your Art
- Wikked Art (Regan Styles)
- Zindy Zone
Scrapbooking Favs
- Angels Scrap Shop
- Aria Sparkle
- Bits2Kits
- Butterfly Blush Designs
- Cajoline Scrap
- Capricious Scraps
- Cool Scraps Digital
- Country Life Graphics
- Crazed Creationz by CBJ
- cu4you
- D.A.I.S.I.E. Company
- Delicious Scraps Shop
- Digi Scrap Kits
- Digi Style Designs
- DigiDesign Resort
- DigiScrap Addicts
- DigiScrap Depot
- Digiscrapbooking.ch
- DigiShopTalk
- Digital Chaos
- Digital Scrapbook Art
- Digital-Crea
- Heartbeatz Creationz
- Heartfelt Perfections
- Honored Scraps
- Inspirations of Scraps Friends
- KCM Graphics
- My Cute Graphics
- OScrap Candy Shack
- Peppermint Creative
- Professional Scrap Designs
- Scrap Girls
- Scrap Orchard
- Scrap Soul
- Scrap Wishes
- Scrapable
- Scrappin Naturally
- Scrapping Your Memories
- Scrappy Freebies
- Studio Girls Scrapbook Graphics
- Sugar N Spice Scraps
- SugarHillCo.com
- Swheat Creations
- Taggers Delight
- The Digichick
- The Kit Cart
- TKO Scraps
- Treasured Scraps
- Twilight Scraps
- Whimsical Divas
- Whisprd Designz
- Wilma4Ever
- Zirconium Scraps
Blog Archive
Was having a moment of "wishful thinking" today and wishing that it were actually vacation time and that we could afford a vacation to the beach again like we did in 2010. Spent a lovely 4 day and 3 night vacation in Ocean View, Virginia. We spent our time fishing, swimming in the ocean, walking the pier, walking around town and checking out the local stores. I wonder why shopping is so much more fun when you are on vacation? It's like the stores just have better goodies than the ones at home do!
Designed this personal Facebook timeline cover as well, just testing out some stamp templates that I came across.
I have had several people ask me how to go about sharing their Incredimail letters that they create on their blog for others to snag as well that are not part of the Yahoo and Google groups that they share them in, so I decided to whip up this tutorial for you and make it nice and simple!
You need a file cabinet on Google Sites to upload your files to. (The reason I suggest Google sites versus 4Shared is that you do not have to wait for the download, and the people saving your letters do not have to click on several different links or wait to receive the letters – makes for happy downloaders who will continue to come back to your site because you've made it easy to receive your letters!)
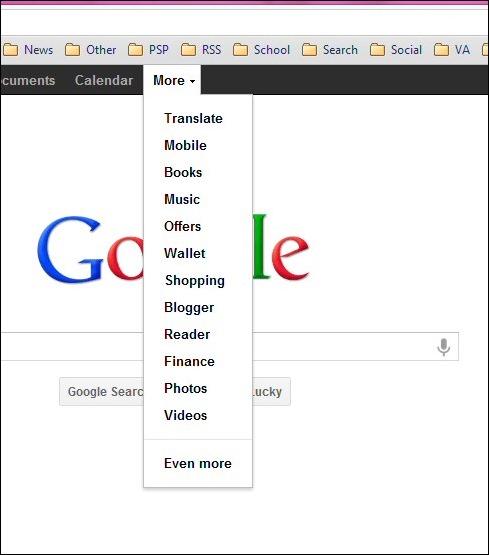
Go to www.google.com and sign in (if you do not have a Google account, make one). Once you are signed in you will see the following bar across the top of your browser:
Click on More and then click on Even more at the bottom of the drop down menu.
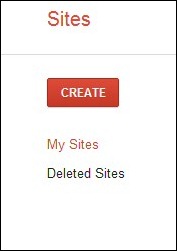
Scroll down to the Home and Office section and click on Sites and when the page opens you want to click on the CREATE button as shown below:
You then need to create your home page – don't worry – it's very simple! Just select the Blank template and then name your site (I suggest something short) and then click on CREATE when you have finished naming your home page:
You will now be taken to your home page for your site as shown below (I had to change my name from IM letters to my letter creations hence the different names) and your site should show up like mine below:
On your new home page – look to the right of your screen and you will see the NEW PAGE option – click on this to create your file cabinet to store your letters and wallpapers and whatever else you would like to share on your blog:
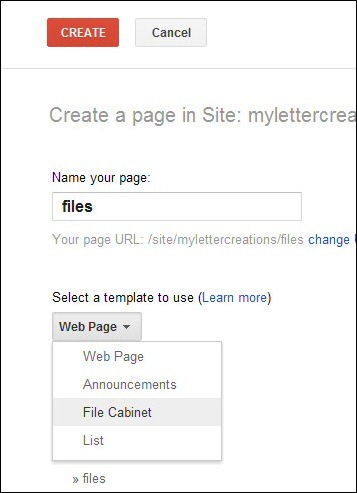
When you select the New page option – you will have the following screen appear. You need to fill in the name of your page (I suggest files) and then scroll down to "Select a template to use" and be sure you choose the "File Cabinet" option. Then just click Create and your file cabinet will now be available!
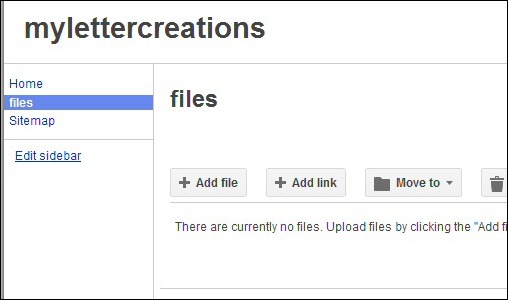
Google will automatically load your Files page for you which will look like this.
Now you can begin uploading your IMF files to share on your blog. To do so all you need to do is click on the Add file button as shown above, select the IMF file from your computer and you are finished! You will now see your IMF file uploaded to the files section as shown below.
Now we are going to show you how to share your IMF file using Blogger. Open a new window in your browser (you need to keep your file cabinet open in another window to access your files) and log in to your blog on Blogger and click on the New Post button to create a new blog post. Insert the Title you wish to use for the blog post and you can begin with your text about your post. We will then add the preview you created in letter creator (see my Letter Creator IMF Preview Tutorial) by clicking on the image link as shown below:
You will see the following screen appear giving you an option to choose a file to upload or to add a link to a preview already online. I suggest just uploading your preview and allowing Blogger to host the image (it is much simpler to do so this way than to upload and link from a photo sharing site such as Photobucket or Fotki). Once you see the preview on your screen with the blue box around it, click on Add Selected so that it will add that particular image to your blog post as shown below:
Your image will automatically be inserted as a small size – once it is inserted you will have the option to choose small medium large or original for your preview size. Use whatever size works best for you and does not overlap your blog post margins and bleed into your sideborder area of your blog.
Once you have adjusted the size of your preview, click the image once and then click on the link selection in your blog post bar. Switch over to your file cabinet and right click on the download link for your IMF letter, and then go back to your blog post window and paste it into the Web address field as shown below:
The nice feature of using Google Sites to host your IMF files is that the file will automatically download when clicked so there is no need to open the link in a new window (although you can leave this box checked if you wish to do so). Once you have inserted your link, click on the OK button and your IMF letter download is now attached to the preview.
All you need to do is instruct your readers to click on the image to download the file, add your labels, and publish!
This tutorial is of my own design and creation and copyrighted to ©Kimberly Miller. Any similarity to any other tutorial is purely coincidental. If you wish to share this tutorial with others, please only share the link to this tutorial in your Yahoo/Google groups and direct others to my blog to view the tutorial post. Thank you!
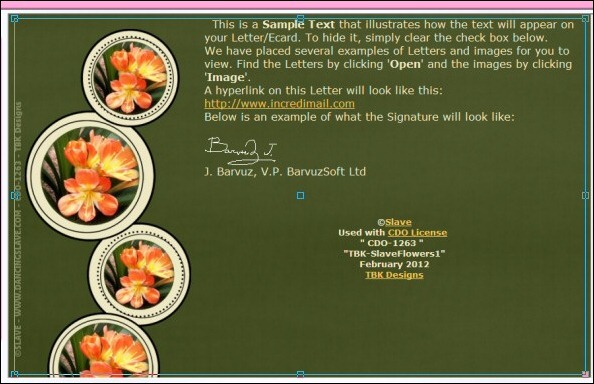
This is a tutorial designed to assist those who create Incredimail stationery in creating a preview of your letters to share on your blogs or web sites to enable others to download your letters.
Very simple tutorial, and only takes a few steps. Put your letter together in Letter Creator as you normally would and add it to your Incredimail files. Before closing your letter creator screen; however, adjust the image preview on your screen so that a majority of the image can be seen as well as the text and/or footer section of your letter.
Your next step is to hit your Prt Scr key on your keyboard (Print Screen) to take a snapshot of your screen and then paste that image into Paintshop Pro or whatever imaging program you are using. We are now going to crop that screenshot image as shown below:
You need to crop just the image area that you want to share. Do not worry about trying to get the entire letter (especially if you have a header and sideborder area) in the cropped area – this is just a preview of the letter to give your readers an overview of what the completed letter looks like.
Once you have this area cropped, just double click on the image and it will delete the areas that are outside the cropped area.
I suggest that when you save your preview you give it the same name as your IMF letter so that they are grouped together on your hard drive and easy to find both the letter and the preview.
You are now ready to move on to the next tutorial – How to Share Your Incredimail Letters on Your Blog.
This tutorial is of my own design and creation and copyrighted to ©Kimberly Miller. Any similarity to any other tutorial is purely coincidental. If you wish to share this tutorial with others, please only share the link to this tutorial in your Yahoo/Google groups and direct others to my blog to view the tutorial post. Thank you!
Happy Earth Day 2012 everyone! To celebrate, I've created this free Earth Day 2012 Facebook timeline cover for you! You can see it in action on my Facebook page here.
Three new Facebook timeline covers now available in the MCM store! A preview of each is below. If you'd like to see the entire timeline, just click here! Just $2.00 each and fully customizable with your information!
Sometimes we all need a bit of inspiration and reminding that God has a plan for each of us, and that He is faithful with all His promises to us and towards all that He has made. When you feel as though you need a bit of inspiration – either for yourself or for a friend – this is the perfect Facebook timeline cover to share that message.
This is a new freebie timeline cover for those of you getting ready to celebrate a birthday, anniversary, or just celebrating a night out on the town without the kids! Whatever your reason – announce your plans with our Party Time freebie!
Many thanks to Scraps 'n Crap for their permission to use their licensed work. This Facebook timeline cover is a personal use freebie and cannot be altered or changed in any manner. Elements and embellishments courtesy of Jenny's Designz.
Who can resist an adorable baby bunny? I know I sure can't! This little guy was nicknamed "Thumper" because of his huge feet. The story behind Thumper is that he was rescued from the side of a road by a friend after his momma had been hit by a car. He took Thumper home (he raises rabbits) and nursed him, but not before I got some cute photos of him!
These images are commercial use freebies. You can download both images and my terms of use HERE.
I do believe that Spring is my most favorite time of the year. While I love the brilliant colors and the cool, crisp temperatures of Fall, there is just something about the gentle rains and the riot of color that springs into bloom this time of year!
Here I have a selection of photos that I have taken from around my neighborhood which can be used commercially. You can download the images individually or you can pick up all of them HERE.

Subscribe
Followers
Like MCM!
Networked Blogs
About Me

45 year young mother to three, living in Virginia with The Man Thing (aka TMT), my two sons (J. and T. ages 12 and 9 respectively), and our family dog, Mollyanna. Being outnumbered by the testosterone is a daily challenge - and creating and designing is a way for me to relax and escape. I hope that you will enjoy what you find here!
This 'n That
Labels
- Blog (13)
- Blog Hops (1)
- Contact (1)
- CT Teams (4)
- CU Freebies (3)
- Extras (1)
- FB Timelines (6)
- Geek Alert (1)
- Giveaway (3)
- IMF (7)
- MCM Photography (2)
- MCM Store (2)
- Memes (1)
- Newsletter (1)
- Project Completed (1)
- PSP Blog Hop (1)
- PU Freebies (8)
- R2G Blog Designs (1)
- Signature Tags (8)
- Tutorials (2)
- Waiting List Updates (1)


